

I. Introduction
This article is the third in our series of three on how to create and sell an NFT. This one takes you through how to sell and trade your NFT collection on AtomicHub. The first article in the series provides an overview of the process, and the second is a step-by-step guide on minting an NFT collection using AtomicHub’s NFT Creator.
II. Selling and Trading Your NFT
1. Creating Your Listing
Assuming you’ve already created a collection, schema, and some assets (see the previous article in this series), you can now ‘list’ your NFT on the AtomicHub Market.
Click on ‘NFT Creator’ to see your collection. Click on ‘View Collection’ and ‘Schema’. Scroll down to ‘Assets’ where you will see your NFT. Click to see your asset summary, which will look something like this:

The ‘History’ section, detailing all your sales transactions, will be blank if you haven’t listed anything yet. Make sure the metadata and details are correct, then click ‘List on Market’:

Clicking ‘List on Market’ will lead you to the ‘Create Listing’ Confirm page:

There are 2 main tabs – ‘Sale’ and ‘Auction’. Set a price for your asset, either in WAX or USD. If you want to auction your asset, set the duration and starting price of your NFT. You will also see the ‘Fee Summary’ with three different percentage fees taken off the price:
- Collection Fee – set by you in ‘Create Collection’ process (a maximum of 15%)
- Marketplace Fee – 2% which goes to WAX “to improve the site”
- Tokenomics Fee – 2% that also goes to WAX which is a “Blockchain specific fee”
Click on the ‘Confirm’ button. A dialog appears confirming ‘This Asset is on sale’ along with a code number. You have just listed your asset on the AtomicHub Market!

If you want, click on the ‘Back Tokens’ button to set a fundamental base value to your NFT. Backing your NFT with tokens might make your NFT more attractive to buyers. The WAX is returned to you if at any point you decide to ‘burn’ the NFT. If you sell the NFT the new owner can burn the NFT, and then they will receive the backed tokens.
TIP: Ignore the ‘Add to WatchList’ button for now. If you do press this button, it will cost you some RAM. You can also ignore the ‘Mutable Attributes’, which are connected to smart contracts.
2. Setting Up Your Profile
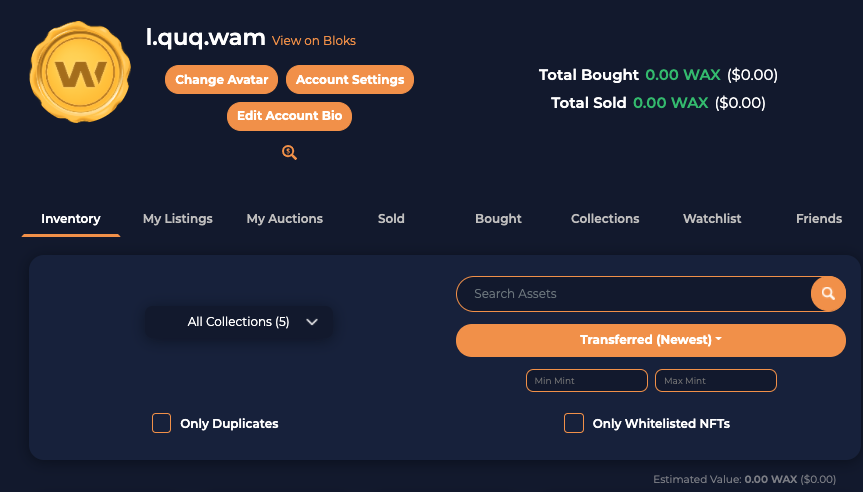
Managing your inventory and listings can be done via your profile page, which you can access by clicking on your WAX account name ‘xx.xxx.wam’ at the top right-hand corner of the page.
A dropdown menu shows three main options: ‘Inventory’, ‘My Listings’, and ‘My Auctions’. Every one of these options allows you to set up and customize your profile. You can ‘Change Avatar’, adjust ‘Account Settings’, and ‘Edit Account Bio’ on these pages.

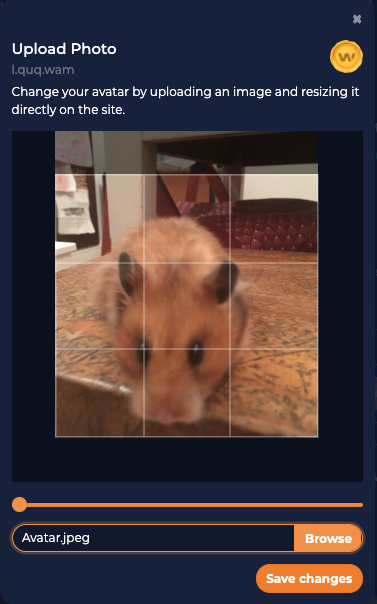
To change your Avatar, you simply upload an image of less than 2Mb then click on ‘Save changes’.

Once you have uploaded it, you will can adjust and crop the picture to fit the correct Avatar shape:
To edit your bio, simply type in your text and use the ‘Preview’ tab to check the formatting. Remember to click ‘Save changes’ once you have finished.

The image below shows your account settings.

There is a small link to the bloks.io website where you can inspect stats and details of your transaction, all of which are public and open.

Just underneath the buttons (‘Inventory’, ‘My Listings’, and ‘My Auctions’), you will see a tiny little icon:

Clicking on the little button takes you to your own Seller Page in the AtomicHub Market:

From ‘Market’ you will find various different ways to filter your collection of NFTs. You can do this according to whether or not they have been listed, or are up for auction. There are other filters you can set by ticking the click boxes or by entering ‘min.’ and ‘max.’ Mint figures. The My Auctions and My Listings pages also allow you also to search other Collections.
Clicking on ‘Inventory’ and scrolling down a bit takes you to this page:

Here, you will see an orange ‘More’ button on each NFT / asset icon. Click it to access a dropdown menu of additional options:

Create Bundle – Select the assets you want to include in the offer. This allows you to sell several NFTs in one bundle.
Transfer – Transfer NFTs to any blockchain account directly. This button takes you directly to a trading page for the NFT you selected where you can transfer ownership of your asset.
Create Link – Create a link that allows only people with the link to claim the NFTs.
New Trade – Select the assets you want to include in the offer, and send them to a named account without paying any transaction fees.
Pin to Profile – Choose your best NFTs to showcase on your profile.
Back Tokens – Back tokens to an NFT. Note that they can only be released again by burning the asset, and that only the account that burns the NFT gets the tokens back. You won’t get the tokens when using a pack or burn contract.
Burn – Burn an NFT. Note that burning an NFT is permanent. Once burned, it will remain in your Inventory marked as ‘Not Owned’.
Click on ‘My Listings’ and scroll down to view this page:

Here you will see your NFT / Asset icon has an ‘Edit’ button. If you want to reset the price of your NFT, click it.
‘My Auctions’ takes you to this page:

Once you have NFTs minted in your Collection, the best place to manage sales and trades is via your AtomicHub Profile. Although the ‘Inventory’, ‘My Listings’, and ‘My Auctions’ pages are similar to one another, once you familiarize yourself with the specific actions on each page, your workflow will become a lot smoother.
3. Selling Your NFTs
Clicking on ‘Market’ will bring you to pages which you will already be familiar with from actions available from your ‘Profile’. Once you have set the filters, you should click on ‘Sell NFTs’:

This will take you to the same pages that are accessible from your Profile pages:
4. Trading Your NFTs
Click on the ‘Trading’ menu to navigate to this page:

You can trade, offer, share your NFTs with other accounts. There is also a useful ‘Create Link’ button which allows you to send a link to people to claim one of your NFTs.

5. Secondary Marketplaces
There are a number of different marketplaces for NFTs. Most of them are based on the Ethereum coin, which supports dApps and smart contracts. Some are exclusive and only allow selected artists and creators to mint NFTs.
WAX is a rising presence and AtomicHub is its leading marketplace. These are also secondary markets for WAX where you can sell your digital items, swap, or barter them. Because you own your NFT digital assets, these are not confined to the platform, game, or WAX marketplace you earned or bought them from. You are free to trade them anywhere you like.
You can also earn money from secondary sales. When you set up a collection, you can set a ‘Market Fee’ percentage (up to 15%) which represents the fee you receive every time that NFT is resold. This can be used as a way to raise funds for yourself as an Artist (similar to crowd-funding), or you can set it up such that a percentage of each sale goes to a specific charity. This can all be set up via a ‘smart contract’ which may require extra programming.
III. Conclusion
Minting an NFT using NFT Creator and then listing it on AtomicHub is that simple. Why not give it a try now!