

I. Introduction
This article is the first in a series of three on how to create and sell an NFT. This one provides an overview of the NFT creation process using AtomicHub and its NFT Creator, one of the main NFT marketplaces and development platforms on WAX. The next two articles provide, respectively, a step-by-step guide to ‘minting’ an NFT and AtomicHub’s Market and Trading services.
II. An Overview of AtomicHub
AtomicHub is a suite of user-friendly mini-apps (called ‘microservices’) written by Pink.gg, one of the main ‘guilds’ producing blocks for the WAX blockchain.
Pink.gg have also published a full NFT standard called ‘AtomicAssets’. The main reason Pink.gg did this was to reduce costs for creators and users by optimizing ‘RAM efficiency’, which also reduces the carbon footprint of the WAX Platform.
AtomicAssets is one of a few NFT asset standards on WAX. Others include Simple Assets and dGoods, both of which are open source (if you have coding skills you can read about the technical differences here and further technical details here).
As a result, Atomic Hub’s ‘NFT Creator’ platform gives users a lot of useful extra features. These include being able to group NFTs inside a collection with schemas and templates to streamline the process of describing finicky attributes. Users can also have multiple owners of a collection of NFTs.
AtomicAssets is only the start of the future development of the WAX platform. The WAX Developer toolkit and AtomicAssets together allow computer coders, using languages such as C++, to create new microservices, dApps (distributed applications), online games, and much more via a range of APIs (application programming interfaces). This means WAX is going to keep growing and improving.
III. Setting Up Your WAX Cloud Wallet (WCW)
Read our step-by-step guide to setting up your Wax Cloud Wallet (WCW) here. It’s a simple process and only takes a few minutes.
Though the WCW gives you enough resources, you can also add some extra WAX tokens to your wallet with a credit card or via a crypto exchange. Just click on any of the ‘Buy WAXP’ buttons and follow the instructions.

If you are using a credit card, you can use a service like Moonpay to buy a minimum of $30 worth of WAXP, whereas a service like Simplex requires you to buy a minimum of $50. Once you have loaded up on WAX, you can buy extra resources (and start buying and trading NFTs).
As a rough guide, the price of minting an NFT in 2021 has so far been between $0.01c and $0.05c. If you want to dive in deeper you can find out the current WAX price online. If you want even more technical details about RAM and resources, the AtomicAssets website has further information.

IV. What Does it Cost to Mint (Create) an NFT?
Unlike other blockchains based on PoW (Proof of Work) WAX does not charge ‘gas fees’ which can get very expensive depending on various factors such as the time of day, or if resources are scarce. The WAX system is based on a much less energy-intensive blockchain DPoS algorithm — good news for your wallet and your carbon footprint!
Instead, the resources needed to create an NFT are: CPU, NET, and RAM.
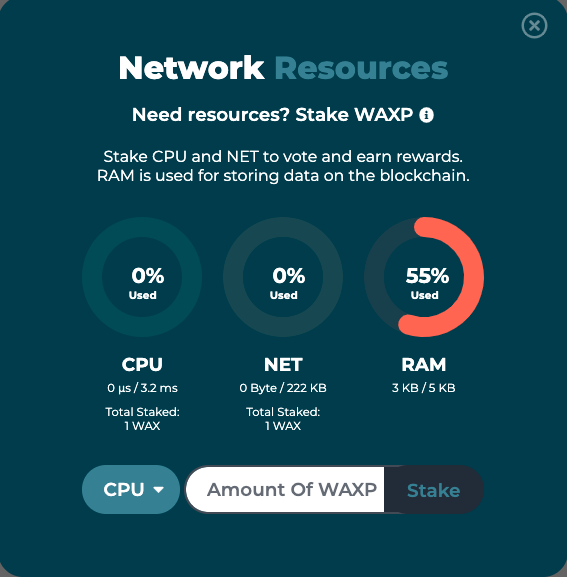
Just above the other ‘Buy WAXP’ button on the right side of the WCW page, you will see a ‘Resources’ button. Click on it to check your available CPU, NET, and RAM.

Other blockchains use something called ‘gas fees’ to regulate how much bandwidth and storage space users take up in minting their assets. These ‘gas fees’ can fluctuate wildly, sometimes shockingly so. WAX does it differently, in a much fairer and more reliable way.
1. RAM
RAM is defined as the storage which gets used up in the step-by-step process of minting. But how much RAM does it cost to mint an NFT? That depends on how many NFTs are in your Collection, how complex the attributes are in your schema and template, and how much text you include. The AtomicAssets website has a lot of deep-dive information and states that “minimal RAM costs” are: “151 Bytes per asset and 112 Bytes per owner” which comes to 0.263Kb per asset.
RAM is paid for in WAX. Bloks.io has a ‘RAM Calculator’ and lots of useful stats and fluctuating prices of many different blockchains. The cost of 1Kb of RAM at the time of writing (September 2021) was “0.5264 WAX per KB or ~$0.18 USD per KB”. That means minting an Asset (NFT) is currently $0.05c USD if you buy WAX at the current price of $0.34c USD.
TIP: it may take a few minutes for the network to register your WAXP purchases, but once you have loaded up, you will see your balance in your WCW page in the top left-hand corner:
2. CPU
CPU is the processing time of an action, measured in microseconds. Along with NET, this is what makes up your WAX ‘bandwidth’. In order to secure it, you must stake some of your WAXP tokens. If you are new to WAX, a certain amount is already staked for you. Your allocation of the bandwidth is a simple equation: your NET/CPU divided by Total NET/CPU. To get more CPU, stake some WAXP (see here for a more detailed explanation).
3. NET
NET is the throughput capacity of the WAX network, measured in bytes. Similar to CPU, this is the other component of WAX’s bandwidth, keeping everything running. To get more NET, stake some WAXP (see here for a more detailed explanation).
V. Log In to AtomicHub
Once you have set up a WCW, open up AtomicHub.
First, you will be asked to ‘Choose Wallet’ and you will see the WAX Cloud Wallet is the recommended option.

Once you click on the WCW option, it triggers a confirmation dialog asking you to connect your WCW to the AtomicHub.
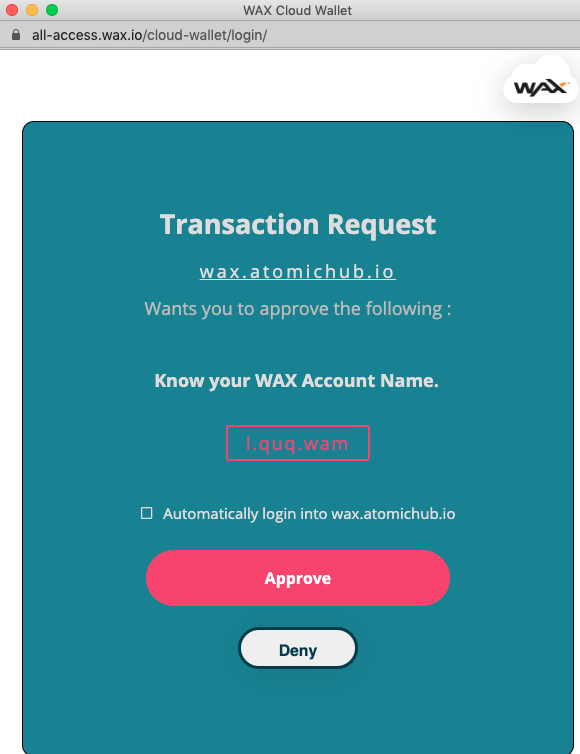
At this stage, you can tick ‘Automatically login to the wax.atomichub.io web-page’ or you can simply press ‘Approve’. We recommend you leave this automatic option unchecked for now, so you get a feel for the way AtomicHub and WCW work together. Don’t worry, you can always check this option later to automatically login, making your workflow a bit smoother.
The AtomicHub web page will now load.

First, check your account name at the top right next to the Search field. Below your account name, you can also check how much WAX you are holding. You can also click on your account name to find other information and profile details.
The top menu line on the main AtomicHub page shows 4 main AtomicHub ‘microservices’:
- Explorer – a place to start browsing other people’s NFTs
- Market – the AtomicHub marketplace including some filtering
- Trading – the peer-to-peer buying & selling area which is “feeless”
- NFT Creator – this is where you will start minting your NFTs
You can take a quick look at all of these microservices straight away to get a feel for what’s out there. Click on the top left-hand icon to return to the main page, it’s all easy to navigate.
VI. Creating a Collection
The Atomic Hub NFT Creator is on the top menu at the right.

You will notice that the main option is not ‘Create New NFT’, but ‘Create New Collection’.

There is a very good reason for this — AtomicHub has a special structure to streamline the minting process and reduce costs for the users by batch processing NFT attributes.
1. Metadata
Attributes for all your NFTs are called ‘metadata’ – literally, the data that describes your collection’s internal info.
To make metadata input easy, AtomicAssets has split it into four simple levels:
- Collection – this groups your Assets together and handles all the basic permissions and information (metadata), so you don’t have to redo this step for each new NFT.
- Schema – this handles any common attributes of the NFTs in your collection; you can have more than one schema per collection, which makes it super-flexible and useful.
- Template – this is an optional layer of description, for different types of assets within a collection and for setting additional attributes according to your schema.
- Asset – this is your actual NFT. Once you have set up the top layers (collection, schema, and template), you can start minting.
TIP: Before you press ‘Confirm’, remember that you are inputting your metadata into an encrypted, distributed blockchain (not into a simple webpage), so it is best to have everything ready and double-checked!
2. Prepare Everything Before You Input It!
NFTs can be anything from a JPEG image or text PDF to an MP3 or MIDI file, and beyond. Using the AtomicHub, WAX stores everything on the blockchain as you go, step-by-step. Some data is ‘mutable’ (i.e. data can be changed or added to later), but some is ‘immutable’ (i.e. cannot be changed or deleted). Whatever you are going to mint, it is best to get your ideas ready before you start: name your collections, schema, templates, and each individual NFT; get your thumbnails and full-res files ready!
TIP: Although it is very easy to mint an NFT, please again remember the WAX blockchain is a permanent ledger. Once you have created a Collection, a Schema, or a Template, they cannot be deleted! Once you mint an Asset, you cannot add any additional Attributes to it, although you can later extend the schema and any subsequent NFTs can include those new attributes.
For more info on how to use the NFT Creator from the developer’s own perspective, check out their article ‘Guide: Using the AtomicHub NFT Creator’.

3. What is NFT Whitelisting and Should I Do It?
‘Whitelisting’ can be an important part of creating an NFT as it is the process by which the AtomicHub support team tries to filter out fakes and scams. A collection gets a white checkmark if it passes the initial basic checks, and it will get an orange checkmark if the owner is a reputable person, with actual followers and a visible social media or online presence.
Whitelisting is an important step if you are an original Artist who made your own JPEGs, or a Composer who wrote the music in an MP3. Submitting a ‘Whitelist Request’ improves your chances of selling your NFTs, otherwise users will see warnings next to your NFT on the Marketplace, like one of these:


Whitelisting a collection is free of charge and done manually by the AtomicHub team. The AtomicHub validation guidelines are found in their FAQ. The main requirements are:
- that your NFT has a unique collection name (e.g. that avoids combinations of common words)
- that your Collection is your own work.
For the latter, you will be asked to input your email address, a brief text about the concept and the plan for your collection, the reasons it should be verified, and any related social media links. That way AtomicHub can check you really are who you say you are.
While this whitelisting is not ever going to be 100% effective, it is done on a ‘best effort’ basis as a way to make sure the WAX Platform stays honest and supports creatives. To find out more, you can visit the AtomicAssets Telegram chat area and join the conversation.
4. What to Do If Your NFT Is Bigger than 2MB: IFPS
AtomicHub isn’t first and foremost a cloud storage platform, so to keep its size in check, there is a default 2MB file limit for each asset.
In order to upload a file that is bigger – say for a video or some audio – you need to get the file placed on the ‘IPFS’ (Inter Planetary File Storage), a decentralized network of servers.
Currently, the best way to do this is via another service called Pinata. There are various levels, of which the ‘Free’ account allows you 1GB of storage and the ‘Individual’ plan gives you unlimited storage at an extra $0.15c per month per GB. The ‘Professional’ plan at $20 per month gets you extras, such as 24/7 help.
On Pinata, you can upload your files and generate the IPFS ‘hash codes’ to cut and paste into your NFT Creator attribute fields. Bear in mind that the IPFS network is more efficient than standard centralized data servers that suffer from cyberattacks and are known for de-platforming or shadow-banning users.
VII. Conclusion
In the old days, you would have paid a team of lawyers, managers, and PR gurus to place your works in a global marketplace. Nowadays, you are in control. Of course there’s a learning curve, but we think you’ll find it’s worth it!
While the majority of NFTs are currently related to video gamers, other areas of business – Art, Music, Real Estate, Loans – are likely to adapt and create new global business models, using decentralized technologies such as DeFi and dApps. The WAX Platform and its consortium of guilds and developers (pink.gg and their AtomicHub being just one of them) are ideally placed to facilitate this entire process.
The bottom line is this: you are unlikely to find a faster, easier, and cheaper way to mint your first NFTs than on the WAX Platform. In doing so, you are plugging into a vibrant and evolving NFT protocol that is constantly developing and improving its core technologies.
Happy minting!
For the next article in our three-part series, click here.